如何自己实现一个IOC容器
……这里我并不想多做关于spring的相关介绍,大家可自行去官网了解相关内容,我们直接进入正题,假如让你自己去做开发,并且spring开始收取高额的费用了,这里只是假设,你该如何去开发?思考一分钟……稍微有点框架基础的人应该都会说自己开发一个IOC框架进行容器管理不就得了,确实,容器管理是本文的重点,今天就来讲解一下第一种方式,通过xml文件的方式来实现IOC容器。
代码结构
……整体的代码结构如下图,下面就逐一解析
入口类TestMain
1 | package com.hk.springioc; |
整个程序的main方法中我们new了一个MyXmlClassPathApplicationContext这样的一个对象,这也是整个稍后IOC构建过程中的核心类,介绍该类之前,先说明两个接口
ApplicationContext用于IOC容器构建
1 | package com.hk.springioc; |
BeanFactory用于对象实例管理与获取
1 | package com.hk.springioc; |
MyXmlClassPathApplicationContext
1 | package com.hk.springioc; |
解释一下这个类主要做了什么:
1、new了一个ConfigManager对象
2、构建了一个HashMap类型的实例化容器instanceContainer
3、用第一步的ConfigManager对象解析XML文件,获取一个Bean容器,这里的Bean就是XML文件中配置的相关bean信息,后面会有一个类进行封装
4、对Bean容器进行解析,构建最终的IOC实例容器,也就是第二步中的instanceContainer
下面就是xml文件以及对应封装类Bean
myspring.xml
配置文件结构如下
1 | <?xml version="1.0" encoding="UTF-8"?> |
ConfigManager
我们可以使用dom4j或者SAXReader对xml文件进行解析,构建需要的Bean容器,这里需要重点说明一点!!!我们的xml配置文件中没有特殊说明的bean都是singleton,也只有单例的对象才需要IOC容器进行管理,非单例的对象IOC容器是不会管理的
1 | package com.hk.springioc; |
最后运行TestMain
查看最终运行结果: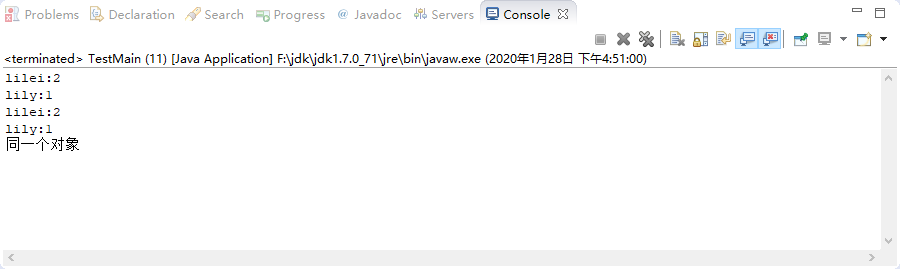
总结
……好了,写到这里我们就简单的实现了一个基于xml配置文件方式的IOC容器,原理其实很简单,只需要你了解reflect以及java基础,难的在于实现,spring框架通过各种设计模式实现了方便大家使用的最终发版,这里我不多做讲解,因为本人也在研究和学习当中,设计模式也是本人的缺陷,本篇文章重点只是向大家介绍一个最基本的实现原理,理解这个原理对于以后的开发会有很大的帮助,下一篇文章中我们再来讨论一下基于annotation的IOC容器构建…谢谢